close
The Stripe payment gateway provides an easy and powerful way to accept credit cards directly on the web application. Stripe makes integrating the checkout system and collecting payment on the website easy. The Stripe API is a powerful solution to integrate the checkout system into the web application to provide a smooth payment experience.
If you want to accept credit card payments on your website, Stripe will be the best option for that. You can easily integrate the checkout system into your PHP-based website, which allows the user to make payments through credit or debit cards without leaving your website. This tutorial will show you how to integrate the Stripe payment gateway in PHP for collecting payments online using credit or debit cards.
In the example script, we will implement the following functionality to demonstrate the Stripe payment gateway integration process.
Before making your Stripe payment gateway integration live, you need to test it thoroughly. To test the credit card payment process with Stripe, the test API Keys are required. You can generate and get the TEST DATA in your Stripe account.
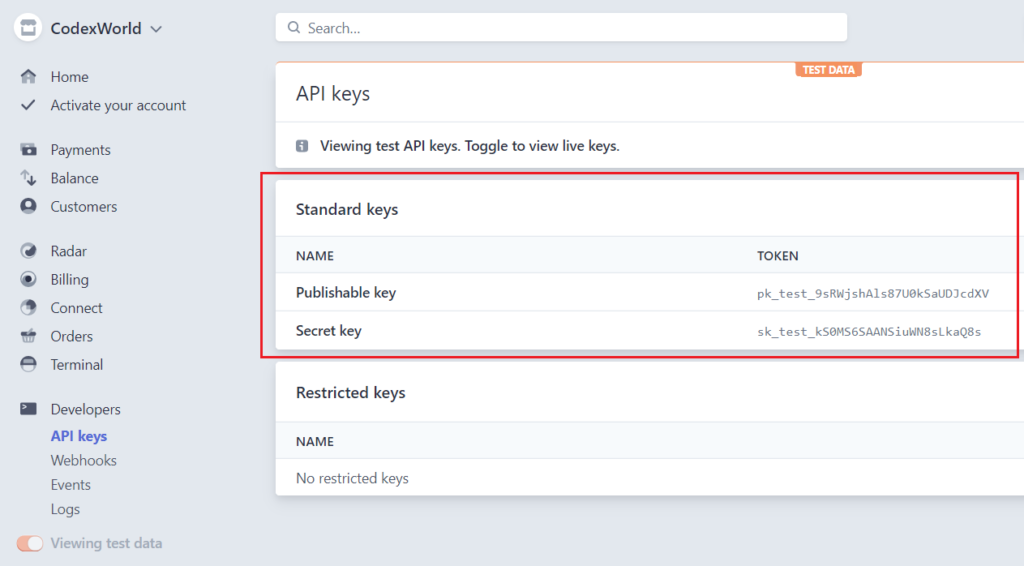
Collect the Publishable key and Secret key to later use in the script.
Before getting started to integrate Stripe payment gateway in PHP, take a look at the file structure for this tutorial:
stripe_integration_in_php/
├── config.php
├── dbConnect.php
├── index.php
├── payment_init.php
├── payment-status.php
├── stripe-php/
├── js/
|    └── checkout.js
└── css/
    └── style.css
Lets’s get started with the Stripe payment gateway integration in PHP and accept credit card payments on your website.
This tutorial uses the Stripe PHP library to access the Stripe API from PHP applications. You can download it from its official GitHub repository or install it via Composer:
composer require stripe/stripe-php
Note: All the required library files are already included in our ready-to-download source code ZIP package. You don’t need to download or install it separately.
First, create a MySQL database (e.g., checkout_db) and a table (e.g., transactions) to store the payment information. You can use phpMyAdmin or any MySQL client to run the following SQL commands:
CREATE TABLE `transactions` (
  `id` int(11) NOT NULL AUTO_INCREMENT,
  `customer_name` varchar(50) DEFAULT NULL,
  `customer_email` varchar(50) DEFAULT NULL,
  `item_name` varchar(255) DEFAULT NULL,
  `item_price` float(10,2) DEFAULT NULL,
  `item_price_currency` varchar(10) DEFAULT NULL,
  `paid_amount` float(10,2) NOT NULL,
  `paid_amount_currency` varchar(10) NOT NULL,
  `txn_id` varchar(50) NOT NULL,
  `payment_status` varchar(25) NOT NULL,
  `created` datetime DEFAULT NULL,
  `modified` datetime DEFAULT NULL,
  PRIMARY KEY (`id`)
) ENGINE=InnoDB DEFAULT CHARSET=utf8mb4;
Create a config.php file to store your database and stripe API configuration settings. Update the following configuration settings in the file:
$itemName, $itemPrice, and $currency).Publishable key and Secret key.DB_HOST, DB_USERNAME, DB_PASSWORD, and DB_NAME).<?php
// Product Details
// Minimum amount is $0.50 US
$itemName = "Demo Product";
$itemPrice = 25;
$currency = "USD";
/* Stripe API configuration
* Remember to switch to your live publishable and secret key in production!
* See your keys here: https://dashboard.stripe.com/account/apikeys
*/
define('STRIPE_PUBLISHABLE_KEY', '_Stripe_API_Publishable_key_HERE_');
define('STRIPE_SECRET_KEY', '_Stripe_API_Secret_key_HERE_');
// Database configuration
define('DB_HOST', 'localhost');
define('DB_USERNAME', 'root');
define('DB_PASSWORD', 'root_pass');
define('DB_NAME', 'codexworld_db');
?>
Note: Make sure to replace the placeholder values of STRIPE_PUBLISHABLE_KEY and STRIPE_SECRET_KEY with your actual Stripe API keys, which you obtained from your Stripe account earlier (Developers > API keys).
Create a dbConnect.php file to establish a connection to the MySQL database using MySQLi.
<?php
// Create database connection
$mysqli = new mysqli(DB_HOST, DB_USERNAME, DB_PASSWORD, DB_NAME);

// Check connection
if ($mysqli->connect_errno) {
    echo "Failed to connect to MySQL: " . $mysqli->connect_error;
    exit();
}
?>
Create an index.php file to display the product details and payment form to the user. The following code includes the necessary components for the Stripe checkout process.
Configuration File: Include the config.php file to access the configuration settings.
<?php
// Include configuration file
require_once 'config.php';
?>
Stripe JS Library: Include the Stripe.js v3 library that helps securely sending the sensitive information to Stripe directly from the browser.
<!-- Stripe JS library -->
<script src="https://js.stripe.com/clover/stripe.js"></script>
Checkout JS Script: Include the checkout.js script to handle the checkout process with Stripe API using JavaScript.
STRIPE_PUBLISHABLE_KEY from the config.php file to the JavaScript file using a custom attribute.<!-- Custom script to process checkout with Stripe API -->
<script src="js/checkout.js" STRIPE_PUBLISHABLE_KEY="<?php echo STRIPE_PUBLISHABLE_KEY; ?>" defer></script>
HTML Payment Form: Create an HTML structure to display the product details and credit card payment form.
paymentFrm) to collect customer name, email and attach card input elements.paymentElement div to mount the Stripe card input elements (card number, expiration date, CVS, etc.) using Stripe JS library.paymentResponse div to display the payment status message.<div class="panel">
<div class="panel-heading">
<h3 class="panel-title">Charge <?php echo '$'.$itemPrice; ?> with Stripe</h3>
<!-- Product Info -->
<p><b>Item Name:</b> <?php echo $itemName; ?></p>
<p><b>Price:</b> <?php echo '$'.$itemPrice.' '.$currency; ?></p>
</div>
<div class="panel-body">
<!-- Display status message -->
<div id="paymentResponse" class="hidden"></div>
<!-- Display a payment form -->
<form id="paymentFrm" class="hidden">
<div class="form-group">
<label>NAME</label>
<input type="text" id="name" class="field" placeholder="Enter name" required="" autofocus="">
</div>
<div class="form-group">
<label>EMAIL</label>
<input type="email" id="email" class="field" placeholder="Enter email" required="">
</div>
<div id="paymentElement">
<!--Stripe.js injects the Payment Element-->
</div>
<!-- Form submit button -->
<button id="submitBtn" class="btn btn-success">
<div class="spinner hidden" id="spinner"></div>
<span id="buttonText">Pay Now</span>
</button>
</form>
<!-- Display processing notification -->
<div id="frmProcess" class="hidden">
<span class="ring"></span> Processing...
</div>
<!-- Display re-initiate button -->
<div id="payReinit" class="hidden">
<button class="btn btn-primary" onClick="window.location.href=window.location.href.split('?')[0]"><i class="rload"></i>Re-initiate Payment</button>
</div>
</div>
</div>
The checkout.js file contains the JavaScript code to handle the Stripe checkout process.
STRIPE_PUBLISHABLE_KEY from the custom attribute defined in the script tag of index.php.payment_intent_client_secret parameter from the URL.payment_intent_client_secret is already present in the URL. If not, initialize the payment form by creating an instance of the Elements UI library and attaching the client secret.initialize() function is used to,
payment_init.php) and capture the client secret.#paymentElement) defined in the payment form.handleSubmit() function is used to,
payment_init.php).stripe.confirmPayment of Stripe Payment Intents JS API.checkStatus() function is used to,
stripe.retrievePaymentIntent method of Stripe Payment Intents JS API.payment_init.php) and redirect to the payment status page (payment-status.php).showMessage() function helps to display status messages.setLoading() function disable submit button and show a spinner on payment submission.setProcessing() function disable the payment form and show the notification about payment processing.setReinit() function help to disable the payment form and display the payment re-initiate button..// Retrieve the Stripe publishable key from the script tag attribute
let STRIPE_PUBLISHABLE_KEY = document.currentScript.getAttribute('STRIPE_PUBLISHABLE_KEY');
// Create an instance of the Stripe object using the publishable key
const stripe = Stripe(STRIPE_PUBLISHABLE_KEY);
let elements; // Define card elements
const paymentFrm = document.querySelector("#paymentFrm"); // Select payment form element
// Get payment_intent_client_secret param from URL
const clientSecretParam = new URLSearchParams(window.location.search).get(
"payment_intent_client_secret"
);
// Check whether the payment_intent_client_secret is already exist in the URL
setProcessing(true);
if(!clientSecretParam){
setProcessing(false);
// Create an instance of the Elements UI library and attach the client secret
initialize();
}
// Check the PaymentIntent creation status
checkStatus();
// Attach an event handler to payment form
paymentFrm.addEventListener("submit", handleSubmit);
// Fetch a payment intent and capture the client secret
let payment_intent_id;
async function initialize() {
const { id, clientSecret } = await fetch("payment_init.php", {
method: "POST",
headers: { "Content-Type": "application/json" },
body: JSON.stringify({ request_type:'create_payment_intent' }),
}).then((r) => r.json());
const appearance = {
theme: 'stripe',
rules: {
'.Label': {
fontWeight: 'bold',
textTransform: 'uppercase',
}
}
};
elements = stripe.elements({ clientSecret, appearance });
const paymentElement = elements.create("payment");
paymentElement.mount("#paymentElement");
payment_intent_id = id;
}
// Card form submit handler
async function handleSubmit(e) {
e.preventDefault();
setLoading(true);
// Get customer details
let customer_name = document.getElementById("name").value;
let customer_email = document.getElementById("email").value;
const createCustomerResp = await fetch("payment_init.php", {
method: "POST",
headers: { "Content-Type": "application/json" },
body: JSON.stringify({ request_type:'create_customer', payment_intent_id: payment_intent_id, name: customer_name, email: customer_email }),
}).then((r) => r.json());
// If server returns validation errors, display them and do not proceed
if (createCustomerResp) {
if (createCustomerResp.error) {
let messages = [];
if (createCustomerResp.error) {
messages.push(createCustomerResp.error);
}
// Show combined message(s)
if (messages.length) {
showMessage(messages.join(' '));
} else {
showMessage('Validation failed.');
}
setLoading(false);
return;
}
}
const { id, customer_id } = createCustomerResp;
const { error } = await stripe.confirmPayment({
elements,
confirmParams: {
// Make sure to change this to your payment completion page
return_url: window.location.href+'?customer_id='+customer_id,
},
});
// This point will only be reached if there is an immediate error when
// confirming the payment. Otherwise, your customer will be redirected to
// your `return_url`. For some payment methods like iDEAL, your customer will
// be redirected to an intermediate site first to authorize the payment, then
// redirected to the `return_url`.
if (error.type === "card_error" || error.type === "validation_error") {
showMessage(error.message);
} else {
showMessage("An unexpected error occured.");
}
setLoading(false);
}
// Fetch the PaymentIntent status after payment submission
async function checkStatus() {
const clientSecret = new URLSearchParams(window.location.search).get(
"payment_intent_client_secret"
);
const customerID = new URLSearchParams(window.location.search).get(
"customer_id"
);
if (!clientSecret) {
return;
}
const { paymentIntent } = await stripe.retrievePaymentIntent(clientSecret);
if (paymentIntent) {
switch (paymentIntent.status) {
case "succeeded":
//showMessage("Payment succeeded!");
// Post the transaction info to the server-side script and redirect to the payment status page
fetch("payment_init.php", {
method: "POST",
headers: { "Content-Type": "application/json" },
body: JSON.stringify({ request_type:'payment_insert', payment_intent: paymentIntent, customer_id: customerID }),
})
.then(response => response.json())
.then(data => {
if (data.payment_txn_id) {
window.location.href = 'payment-status.php?pid='+data.payment_txn_id;
} else {
showMessage(data.error);
setReinit();
}
})
.catch(console.error);
break;
case "processing":
showMessage("Your payment is processing.");
setReinit();
break;
case "requires_payment_method":
showMessage("Your payment was not successful, please try again.");
setReinit();
break;
default:
showMessage("Something went wrong, please try again.");
setReinit();
break;
}
} else {
showMessage("Something went wrong, please try again.");
setReinit();
}
}
// Display message
function showMessage(messageText) {
const messageContainer = document.querySelector("#paymentResponse");
messageContainer.classList.remove("hidden");
messageContainer.textContent = messageText;
setTimeout(function () {
messageContainer.classList.add("hidden");
messageContainer.textContent = "";
}, 5000);
}
// Show a spinner on payment submission
function setLoading(isLoading) {
if (isLoading) {
// Disable the button and show a spinner
document.querySelector("#submitBtn").disabled = true;
document.querySelector("#spinner").classList.remove("hidden");
document.querySelector("#buttonText").classList.add("hidden");
} else {
// Enable the button and hide spinner
document.querySelector("#submitBtn").disabled = false;
document.querySelector("#spinner").classList.add("hidden");
document.querySelector("#buttonText").classList.remove("hidden");
}
}
// Show a spinner on payment form processing
function setProcessing(isProcessing) {
if (isProcessing) {
paymentFrm.classList.add("hidden");
document.querySelector("#frmProcess").classList.remove("hidden");
} else {
paymentFrm.classList.remove("hidden");
document.querySelector("#frmProcess").classList.add("hidden");
}
}
// Show payment re-initiate button
function setReinit() {
document.querySelector("#frmProcess").classList.add("hidden");
document.querySelector("#payReinit").classList.remove("hidden");
}
The following is the server-side code to process payment and charge credit card using Stripe API with PHP. The script handles three types of requests: creating a PaymentIntent, creating a Customer, and inserting payment transaction data into the database.
<?php
// Include the configuration file
require_once 'config.php';

// Include the database connection file
include_once 'dbConnect.php';

// Include the Stripe PHP library
require_once 'stripe-php/init.php';

// Create an instance of the Stripe client
$stripe = new \Stripe\StripeClient(STRIPE_SECRET_KEY);

// Set response content type to JSON
header('Content-Type: application/json');

// Retrieve JSON from POST body
$jsonStr = file_get_contents('php://input');
$jsonObj = json_decode($jsonStr);

if($jsonObj->request_type == 'create_payment_intent'){
    // Define item price and convert to cents
    $itemPriceCents = round($itemPrice*100);

    try {
        // Create PaymentIntent with amount and currency
        $paymentIntent = $stripe->paymentIntents->create([
            'amount' => $itemPriceCents,
            'currency' => $currency,
            // In the latest version of the API, specifying the `automatic_payment_methods` parameter is optional because Stripe enables its functionality by default.
            /*'automatic_payment_methods' => [
                'enabled' => true,
            ],*/
            'payment_method_types' => [
                'card'
            ]
        ]);

        $output = [
            'id' => $paymentIntent->id,
            'clientSecret' => $paymentIntent->client_secret
        ];

        echo json_encode($output);
    } catch (Error $e) {
        http_response_code(500);
        echo json_encode(['error' => $e->getMessage()]);
    }
}elseif($jsonObj->request_type == 'create_customer'){
    $payment_intent_id = !empty($jsonObj->payment_intent_id)?$jsonObj->payment_intent_id:'';
    // sanitize user input
    $name = !empty($jsonObj->name)?mb_substr(strip_tags($jsonObj->name), 0, 255):'';
    $email = !empty($jsonObj->email)?mb_substr($jsonObj->email, 0, 255):'';

    // Input validation
    if(empty($payment_intent_id) || empty($name) || empty($email)){
        http_response_code(500);
        echo json_encode(['error' => 'Please fill all the required fields!']);
        exit();
    }

    // Check if customer already exists with the given email
    try {
        // Check PaymentIntent for customer
        if(!empty($payment_intent_id)){
            $paymentIntent = $stripe->paymentIntents->retrieve($payment_intent_id);
            if(!empty($paymentIntent->customer)){
                $customer_id = $paymentIntent->customer;
            }
        }

        // Search for existing customer by email
        if(empty($customer_id)){
            $customers = $stripe->customers->search([
                'query' => 'email:\'' . $email . '\'',
            ]);

            if (!empty($customers->data)) {
                $customer = $customers->data[0];
                $customer_id = $customer->id;

                // Update customer name if changed
                $customer = $stripe->customers->update(
                    $customer_id,
                    ['name' => $name]
                );
            }
        }
    } catch (\Stripe\Exception\ApiErrorException $e) {
        $api_error = $e->getMessage();
    }

    // Add customer to stripe if not created already
    if(empty($customer_id)){
        try {
            $customer = $stripe->customers->create([
                'name' => $name,
                'email' => $email
            ]);
            $customer_id = $customer->id;
        }catch(Error $e) {
            $api_error = $e->getMessage();
        }
    }

    if(empty($api_error) && !empty($customer_id)){
        try {
            // Update PaymentIntent with the customer ID
            $paymentIntent = $stripe->paymentIntents->update($payment_intent_id, [
                'customer' => $customer_id
            ]);
        } catch (Error $e) {
            $api_error = $e->getMessage();
        }

        if(empty($api_error) && $paymentIntent){
            $output = [
                'id' => $payment_intent_id,
                'customer_id' => $customer_id
            ];
            echo json_encode($output);
        }else{
            http_response_code(500);
            echo json_encode(['error' => $api_error]);
        }
    }else{
        http_response_code(500);
        echo json_encode(['error' => $api_error]);
    }
}elseif($jsonObj->request_type == 'payment_insert'){
    $payment_intent = !empty($jsonObj->payment_intent)?$jsonObj->payment_intent:'';
    $customer_id = !empty($jsonObj->customer_id)?$jsonObj->customer_id:'';

    // Retrieve customer info
    try {
        $customer = $stripe->customers->retrieve($customer_id);
    }catch(Error $e) {
        $api_error = $e->getMessage();
    }

    // Check whether the charge was successful
    if(!empty($payment_intent) && $payment_intent->status == 'succeeded'){
        // Transaction details
        $transaction_id = $payment_intent->id;
        $paid_amount = $payment_intent->amount;
        $paid_amount = ($paid_amount/100);
        $paid_currency = $payment_intent->currency;
        $payment_status = $payment_intent->status;

        $customer_name = $customer_email = '';
        if(!empty($customer)){
            $customer_name = !empty($customer->name)?$customer->name:'';
            $customer_email = !empty($customer->email)?$customer->email:'';
        }

        // Check if any transaction data exists already with the same TXN ID
        $sqlQ = "SELECT id FROM transactions WHERE txn_id = ?";
        $stmt = $mysqli->prepare($sqlQ);
        $stmt->bind_param("s", $transaction_id);
        $stmt->execute();
        $stmt->bind_result($row_id);
        $stmt->fetch();

        $payment_id = 0;
        if(!empty($row_id)){
            $payment_id = $row_id;
        }else{
            // Insert transaction data into the database
            $sqlQ = "INSERT INTO transactions (customer_name,customer_email,item_name,item_price,item_price_currency,paid_amount,paid_amount_currency,txn_id,payment_status,created,modified) VALUES (?,?,?,?,?,?,?,?,?,NOW(),NOW())";
            $stmt = $mysqli->prepare($sqlQ);
            $stmt->bind_param("sssdsdsss", $customer_name, $customer_email, $itemName, $itemPrice, $currency, $paid_amount, $paid_currency, $transaction_id, $payment_status);
            $insert = $stmt->execute();

            if($insert){
                $payment_id = $stmt->insert_id;
            }
        }

        $output = [
            'payment_txn_id' => base64_encode($transaction_id)
        ];
        echo json_encode($output);
    }else{
        http_response_code(500);
        echo json_encode(['error' => 'Transaction has been failed!']);
    }
}
?>
Based on the payment response from Stripe (paymentIntent.status), the user will be redirected to this page. This page fetches the transaction details from the database and displays the payment status message to the user.
<?php
// Include the configuration file
require_once 'config.php';

// Include the database connection file
require_once 'dbConnect.php';

$payment_ref_id = $statusMsg = '';
$status = 'error';

// Check whether the payment ID is not empty
if(!empty($_GET['pid'])){
    $payment_txn_id  = base64_decode($_GET['pid']);

    // Fetch transaction data from the database
    $sqlQ = "SELECT id,txn_id,paid_amount,paid_amount_currency,payment_status,customer_name,customer_email FROM transactions WHERE txn_id = ?";
    $stmt = $db->prepare($sqlQ);
    $stmt->bind_param("s", $payment_txn_id);
    $stmt->execute();
    $stmt->store_result();

    if($stmt->num_rows > 0){
        // Get transaction details
        $stmt->bind_result($payment_ref_id, $txn_id, $paid_amount, $paid_amount_currency, $payment_status, $customer_name, $customer_email);
        $stmt->fetch();

        $status = 'success';
        $statusMsg = 'Your Payment has been Successful!';
    }else{
        $statusMsg = "Transaction has been failed!";
    }
}else{
    header("Location: index.php");
    exit;
}
?>

<?php if(!empty($payment_ref_id)){ ?>
    <h1 class="<?php echo $status; ?>"><?php echo $statusMsg; ?></h1>

    <h4>Payment Information</h4>
    <p><b>Reference Number:</b> <?php echo $payment_ref_id; ?></p>
    <p><b>Transaction ID:</b> <?php echo $txn_id; ?></p>
    <p><b>Paid Amount:</b> <?php echo $paid_amount.' '.$paid_amount_currency; ?></p>
    <p><b>Payment Status:</b> <?php echo $payment_status; ?></p>

    <h4>Customer Information</h4>
    <p><b>Name:</b> <?php echo $customer_name; ?></p>
    <p><b>Email:</b> <?php echo $customer_email; ?></p>

    <h4>Product Information</h4>
    <p><b>Name:</b> <?php echo $itemName; ?></p>
    <p><b>Price:</b> <?php echo $itemPrice.' '.$currency; ?></p>
<?php }else{ ?>
    <h1 class="error">Your Payment been failed!</h1>
    <p class="error"><?php echo $statusMsg; ?></p>
<?php } ?>
To test the payment process, you need test card details. Use any of the following test card numbers, a valid future expiration date, and any random CVC number, to test Stripe payment gateway integration in PHP.
The 3D Secure feature requires additional authentication for credit card transactions. Use the following test cards to simulate the payment process that involves 3D Secure authentication.
Once the integration is completed and the payment process is working properly, follow the below steps to make Stripe payment gateway live.
config.php file, replace the Test API keys (Publishable key and Secret key) with the Live API keys (Publishable key and Secret key).
define('STRIPE_PUBLISHABLE_KEY', 'LIVE_API_Publishable_key');
define('STRIPE_SECRET_KEY', 'LIVE_API_Secret_key');
PayPal Payment Gateway Integration in PHP
With this tutorial, you have learned how to integrate Stripe payment gateway in PHP web application to accept credit/debit card payments. The Stripe payment gateway is the easiest way to accept credit card payments on the web application. Our example code uses the Stripe PHP library to create a charge and make payment with a credit/debit card. The 3D Secure authentication is integrated to make this Stripe integration script ready for SCA (Strong Customer Authentication). If you want to use Stripe hosted checkout system, integrate redirect-based Stripe Checkout in PHP.
Looking for expert assistance to implement or extend this script’s functionality? Submit a Service Request
💰 Budget-friendly • 🌍 Global clients • 🚀 Production-ready solutions


With your code, we need to initialize to add price in stripe. How people can select a product into page and update the price ?